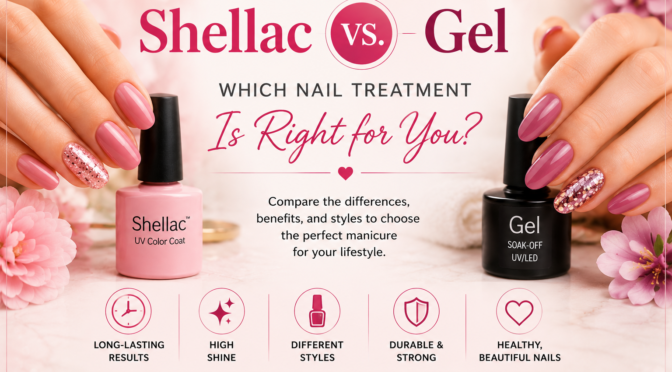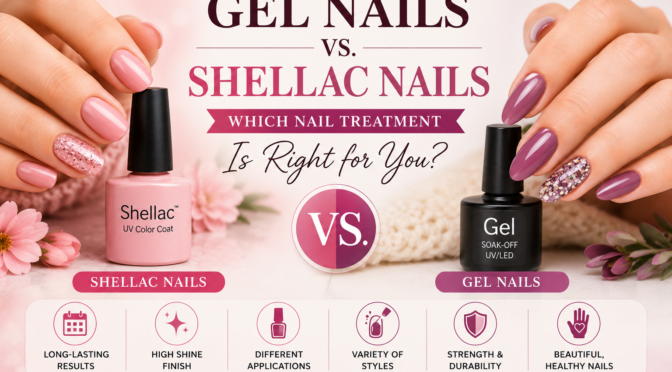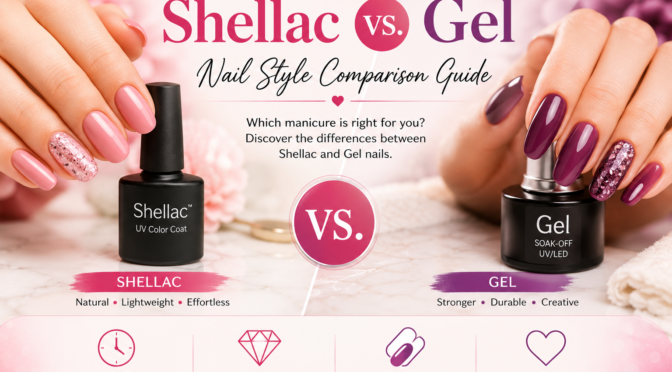
When it comes to achieving beautiful, long-lasting nails, Shellac and Gel manicures are two of the most popular choices. Both treatments deliver a glossy finish, impressive durability, and weeks of chip-resistant wear, making them excellent alternatives to traditional nail polish.
However, many people are unsure which option best suits their needs. Is Shellac better for natural nails? Does Gel last longer? Which is easier to remove? The answer depends on your lifestyle, nail goals, and personal preferences.
In this guide, we’ll compare Shellac vs. Gel in detail, helping you understand the key differences so you can confidently choose the right nail treatment.
What Is a Shellac Manicure?
Shellac is a hybrid nail product that combines the qualities of traditional nail polish with gel technology. It is applied in thin layers like regular polish and cured under an LED lamp to create a smooth, glossy finish.
Unlike thicker Gel products, Shellac is designed to maintain a lightweight, natural feel while offering significantly longer wear than regular nail polish.
Benefits of Shellac
- Lightweight and flexible
- Natural-looking finish
- High-gloss shine
- Chip-resistant
- Fast curing under an LED lamp
- Easier professional removal
Shellac is an excellent option for clients who want elegant, polished nails without adding noticeable thickness.
What Are Gel Nails?
Gel nails use a thicker gel-based formula that cures under an LED or UV lamp. The stronger consistency creates a durable protective layer over the natural nail and can also be used for overlays or extensions.
Gel manicures are ideal for clients who want extra strength, longer wear, and more creative nail designs.
Benefits of Gel Nails
- Exceptional durability
- Strong nail reinforcement
- Long-lasting shine
- Perfect for nail art
- Suitable for nail extensions
- Highly resistant to chipping
Gel remains one of the most popular professional nail treatments because of its versatility and durability.
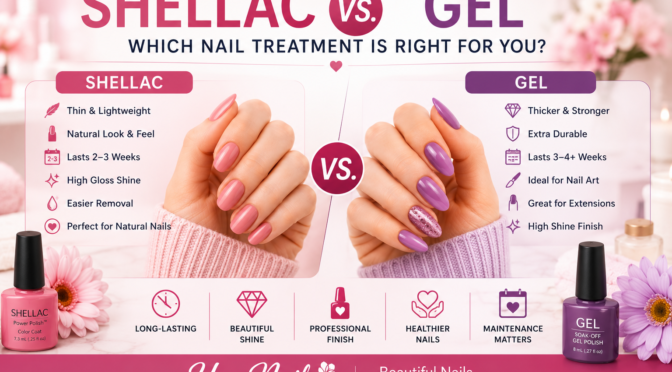
Shellac vs. Gel: The Key Differences
Although Shellac and Gel share many similarities, several important differences set them apart.
1. Formula
Shellac
Shellac combines traditional nail polish with gel technology.
The result is:
- Thinner application
- More flexibility
- Lightweight feel
Gel
Gel uses a thicker gel formula designed for additional strength and durability.
Best For
- Shellac: Natural appearance
- Gel: Stronger nails
2. Durability
Shellac
A professional Shellac manicure usually lasts:
2–3 weeks
It performs well for everyday activities while maintaining a glossy finish.
Gel
Gel manicures typically last:
3–4 weeks or longer
Because of its thicker formula, Gel generally offers greater resistance to chipping and wear.
Winner: Gel
3. Appearance
Shellac
Shellac creates:
- Smooth finish
- Elegant shine
- Natural appearance
Gel
Gel provides:
- High-gloss finish
- Fuller look
- Slightly thicker appearance
Both options deliver beautiful salon-quality results.
4. Nail Strength
Shellac
Shellac protects the natural nail while remaining flexible.
Gel
Gel creates a stronger protective coating that can help reinforce weak or brittle nails.
Winner: Gel
5. Flexibility
One advantage of Shellac is its lightweight feel.
Because it is thinner, Shellac moves naturally with your nails and feels more like traditional polish.
Gel provides additional structure but is less flexible.
Winner: Shellac
6. Nail Art Possibilities
Shellac
Excellent for:
- Solid colors
- French manicures
- Minimalist designs
- Classic elegance
Gel
Ideal for:
- Intricate nail art
- Chrome finishes
- Ombre effects
- Rhinestones
- Sculpted nails
- Nail extensions
Winner: Gel
7. Removal
Shellac
Shellac is generally easier to remove professionally.
Most Shellac manicures soak off in approximately:
10–15 minutes
Gel
Gel usually requires more soaking time and may involve gentle filing before removal.
Improper removal of either treatment can damage natural nails, so professional removal is always recommended.
Shellac vs. Gel Comparison Table
| Feature | Shellac | Gel |
|---|---|---|
| Formula | Hybrid polish | Thick gel |
| Feel | Lightweight | Structured |
| Durability | 2–3 weeks | 3–4+ weeks |
| Shine | High | High |
| Strength | Moderate | Excellent |
| Flexibility | High | Moderate |
| Removal | Easier | More involved |
| Extensions | No | Yes |
| Nail Art | Simple designs | Advanced designs |
Which Treatment Is Better for You?
The right manicure depends on your lifestyle and beauty preferences.
Choose Shellac If You:
- Prefer lightweight nails
- Like a natural appearance
- Want glossy color for several weeks
- Change nail colors frequently
- Prefer easier removal
- Want a low-maintenance manicure
Shellac is an excellent everyday option for clients who want polished, elegant nails.
Choose Gel If You:
- Need stronger nails
- Want maximum durability
- Love detailed nail art
- Prefer longer-lasting manicures
- Need nail extensions
- Have weak or brittle nails
Gel is ideal for clients looking for strength, versatility, and long-term wear.
Which Lasts Longer?
If your priority is longevity, Gel generally has a slight advantage.
However, both treatments significantly outperform traditional nail polish.
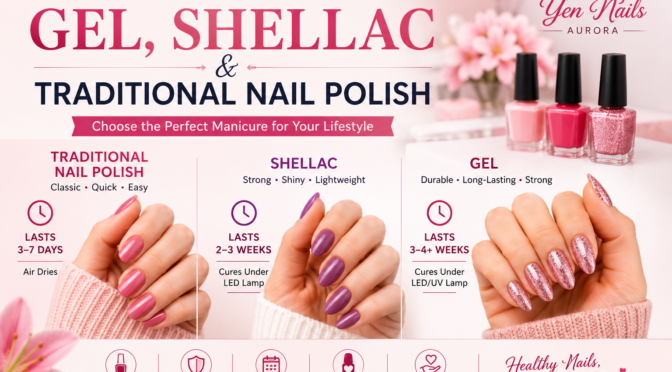
Typical wear times:
- Traditional polish: 3–7 days
- Shellac: 2–3 weeks
- Gel: 3–4 weeks or longer
Your results may vary depending on:
- Nail growth
- Daily activities
- Water exposure
- Nail care habits
- Professional application
Tips to Make Your Manicure Last Longer
Whether you choose Shellac or Gel, proper care helps maximize your results.
Moisturize Daily
Healthy cuticles contribute to healthier nails.
Wear Gloves During Cleaning
Household chemicals and prolonged water exposure can shorten the lifespan of your manicure.
Avoid Using Nails as Tools
Opening packages or scraping surfaces can damage your manicure.
Schedule Regular Maintenance
Routine appointments help maintain beautiful nails while supporting nail health.
Why Choose Professional Nail Care?
Professional application plays a major role in how long your manicure lasts.
At Yen Nails Aurora, our experienced nail technicians provide:
- Professional Shellac manicures
- Durable Gel manicures
- Customized nail designs
- Safe sanitation practices
- Premium-quality products
- Personalized recommendations based on your lifestyle
Whether you prefer classic elegance or bold, creative nail art, our team is dedicated to helping you achieve beautiful, healthy, long-lasting nails.
Frequently Asked Questions
Is Shellac safer than Gel?
Both treatments are considered safe when applied and removed properly by trained professionals.
Can I switch between Shellac and Gel?
Yes. Many clients alternate depending on special occasions, vacations, or seasonal preferences.
Which is easier to remove?
Shellac generally removes more quickly than Gel, but both should ideally be removed professionally to protect the natural nail.
Which is better for weak nails?
Gel may provide additional support for weak nails because of its thicker formula, while Shellac is a good choice for those who prefer a lighter feel.
Final Thoughts
When comparing Shellac vs. Gel, there isn’t a single “best” option—only the one that’s best for you.
Choose Shellac if you prefer:
- Lightweight nails
- Natural beauty
- Easier removal
- Elegant shine
Choose Gel if you want:
- Maximum durability
- Stronger nail protection
- Longer wear
- Creative nail designs
At Yen Nails Aurora, our professional technicians can help you select the perfect treatment based on your lifestyle, nail health, and personal style. Whether you’re visiting for your first manicure or maintaining your signature look, we’re here to ensure your nails stay healthy, beautiful, and polished.